Pages

Tuesday, November 27, 2012

How to implement cascading LOV's in search criteria

Cascading LOV is a common requirement. It is dependencies of an LOV on the selected value of another LOV. In this post, I will explain how cascade LOV can be implemented in a search criteria form.

Use Case:
Searching all the employees reporting to a manager in a department. For this, cascading LOV has to be used to define the dependencies between departments and the list of all employees in that department. i.e one LOV on DepartmentId and another LOV on ManagerId to retrieve all the employees in the selected DepartmentId LOV.

Steps:
1. Create Read Only view Objects on Employees, Departments table. (hr schema is used)
     Say EmployeesVO and DepartmentsVO
2. Define a view criteria (findByDepartmentId) in EmployeesVO to filter all the employees based on a DepartmentId.


3. Add DepartmentsVO and EmployeesVO as view accessors to EmployeesVO. In the added Employees view accessor, shuttle the view criteria(created in step #2) to the right. Provide the value for the bind variable as DepartmentId.


4. Define LOV's on DepartmentId (wrt Departments view accessor) and ManagerId (wrt Employees view accessor). Once a Department is selected in Department LOV, DepartmentId attribute will hold the value of selected department. This selected value is passed to the findByDepartmentId view criteria as defined in the above steps.

5. Define a view criteria (findByDepartmentMgrId) in EmployeesVO, which will be dragged and dropped as a query component on jspx page.


6. In the view controller project, create a jspx page. Drag the view criteria defined in the above step as query component. 


7. Run the jspx page. Dept Id LOV will show all the departments, while Mgr Id LOV will show all the employees for the selected Department. After selecting the Dept Id and Mgr Id values, click on Search button. The resultant table will show all the employees reporting to the selected manager of the selected department.


Sample Workspace:
Download the sample workspace from here.

Monday, September 17, 2012

Navigate to a different page upon successful login in web center portal application

In this post, I will describe how can an end user navigate to a different page upon successful login in a WebCenter Portal application.  By default the user is navigated to home.jspx page. But if the user wants to navigate to a different page, he/she can configure it in faces-config.xml.

By default the generated faces-config.xml file in a web center portal application looks like:  


Upon successful login, the home page is displayed:


Modify in faces-config.xml, such that the navigation-case points to a different page (ex: About Us)


Upon successful login, the user will be navigated to About Us page:

Friday, September 14, 2012

How to set classpath in weblogic server

Developers like me might have struggled to figure out a way to set some jars in the CLASSPATH of the weblogic server to access and load the correct Java classes when the server starts. So, I thought of putting my solution in this blog, which might be useful for some developers.

Basically you need to modify the WEBLOGIC_CLASSPATH environment variable in commEnv.cmd file located at <WL_HOME>\common\bin

In my case it is C:\11.1.1.6\wlserver_10.3\common\bin\commEnv.cmd

Append the WEBLOGIC_CLASSPATH variable at the end with the location of jars to be loaded as below:
set WEBLOGIC_CLASSPATH=%JAVA_HOME%\lib\tools.jar;%WL_HOME%\server\lib\weblogic_sp.jar;%WL_HOME%\server\lib\weblogic.jar;%FEATURES_DIR%\weblogic.server.modules_10.3.5.0.jar;%WL_HOME%\server\lib\webservices.jar;%ANT_HOME%/lib/ant-all.jar;%ANT_CONTRIB%/lib/ant-contrib.jar;C:\Users\uagarwal\Downloads\lib\tdgssconfig.jar;C:\Users\uagarwal\Downloads\lib\terajdbc4.jar;
Here, I have set 
C:\Users\uagarwal\Downloads\lib\tdgssconfig.jar; 
C:\Users\uagarwal\Downloads\lib\terajdbc4.jar; 
at the end of the WEBLOGIC_CLASSPATH. 
Alternatively, you can put the jars in <WL_HOME>\server\lib where other jars are present. But don't forget to restart the server, in order to pick the latest classes by the server.

Using managed property to evaluate bindings

In this post, I will describe how to get hold of DCBindingContainer using managed property.

Managed property is a bean attribute that is exposed through getter and setter methods in a managed bean. The <managed-property> element is a child of <managed-bean> element in adfc-config.xml. It calls its equivalent setter method defined in the managed bean upon bean initialization. Managed property must have a name and a value.
                                                  Managed property can be defined in adfc-config.xml to have an expression always evaluated and ready for use. For example, a managed property can be used to evaluate #{bindings}, which is used to get hold of DCBindingContainer.

For this, define a managed bean and register the bean in adfc-config.xml file. In adfc-config.xml, select the bean, where a managed property has to be defined. Click on Add(+) button to add a managed property:


after the modification, the source code looks like:


In the bean define getter and setter for the managed property as:


You can use (DCBindingContainer)getBindings to get hold of DCBindingContainer as shown above.

Tuesday, September 4, 2012

How to modify end point URL's in an ADF/WebCenter application

Developers might have came across situations where they need to modify WSDL end point URL's, some properties or constants pertaining to a server before deploying their ADF/WebCenter application on different servers. Modifying these every time before deployment is a pain. So there should be some repository where you can define all these end point urls and properties, OR some mechanism such that the deployment process takes care of pointing to correct end point url's and properties before deploying on respective server.

There are many ways to achieve this. I will describe a few, which I implemented in some of my projects.
1. Deploying a .properties file as shared library on respective servers
2. Using build.xml file to modify the properties/URL's before deployment
3. Reading the properties/URL's from a db table.

All the above implementations have their own pros and cons. In this blog I will describe how to use properties file to change the WSDL end point URLs. With my next blog I will describe how to read the properties from a db table.

Create a simple project in the application which will contain the properties file. The project structure is as shown: 


Create a properties file that contains all the properties pertaining to all the servers.


Create a WAR deployment profile for the project. WAR profile will be deployed as Shared Library on respective servers. Create a JAR profile as well for the project, for successful compilation of main application.

You need to create and set MANIFEST.MF file to describe the above shared library. 


Sample MANIFEST.MF file with shared library name: WrsTsrMgrSharedProbLib


While deploying this WAR package, select Deploy as a shared Library option.


After successful deployment, you can see shared library WrsTsrMgrSharedProbLib under deployments.


Add the JAR created above in the main application for its successful compilation. However, this jar should not be packaged inside EAR archive during deployment. For this, uncheck it from WAR contributors of the main application as shown.


One last configuration required in main application is to register the shared library in the weblogic.xml file. This will allow the consuming applications to access the properties file at run time.


 You can access the properties file as below to change the end point URL in service.java file.


Where getProperty method(defined in an utility class, PropertiesUtil) is:


Developers need to deploy the properties file once before deploying the main application on respective servers. It is not required to deploy the shared library always before the main application deployment, unless and until any property is changed. However, if the shared library has to be deployed, the main application should be brought down and started again to pick the latest changes.

Another approach to modify the end point urls or properties is to write a build script that should be ran before deployment. The build file will change all the properties appropriately using the Replace ant task.

Friday, August 31, 2012

Great WebCenter Tutorial

I found an excellent tutorial on WebCenter by Yannick Ongena. It is very helpful for novice webcenter developers.
Blog: http://www.yonaweb.be/webcenter_tutorial/introduction 
Very easy to get started with WebCenter after reading this tutorial. The concepts are very well explained with a lot of screen shots.

Another blog from Yannick Ongena for installing webcenter:
http://yonaweb.be/installing_webcenter_11g_ps3_scratch 

Thursday, July 5, 2012

How to pass Oracle Table Type Object from Java Code to Oracle Stored Procedure

I had a requirement to pass Oracle Table Type Objects to a Store procedure. In this blog, I will explain how we can pass the Table type object from Java code.

The table type objects I used are: 
JTF_NUMBER_TABLE               //Table type of Number Type       JTF_VARCHAR2_TABLE_100  //Table type of Varchar2(100) Type
These two objects are input parameters to the stored procedure.

If you have Number, String Array as shown below:
Number[] srContactPointId = new Number[4];
String[] contactType = new String[4];   

These can be passed as Table type Object using the following code.

//Getting hold of the transaction
DBTransaction txn = (DBTransaction)wrsAmImpl.getDBTransaction();
OracleCallableStatement cstmt = (OracleCallableStatement)txn.createCallableStatement(cs, 1);

//Getting the Connection Object
Connection conn = cstmt.getConnection();

//Creating oracle.sql.ArrayDescriptor Object for corresponding Table Type Object.
ArrayDescriptor numberDescriptor =  new ArrayDescriptor("APPS.JTF_NUMBER_TABLE", conn);
ArrayDescriptor stringDescriptor =  new ArrayDescriptor("APPS.APPS.JTF_VARCHAR2_TABLE_100", conn);

//Creating oracle.sql.ARRAY object to be passed to the Oracle Stored Procedure
ARRAY contactPointId = new ARRAY(numberDescriptor , conn, contactPartyId);
ARRAY contType = new ARRAY(stringDescriptor , conn, contactType);

Tuesday, July 3, 2012

Defining a tooltip for Table filter column/field.

In one of my project I had a requirement to show tool tip/short description for a table column filter. In this post, I will explain how to define tool tip for table filter.

- Select the column in the table for which you want to define tool tip. 

- Expand Column facets node for that column and select filter facet

- Inside the filter facet insert an Input Text component and set it's value property to #{vs.filterCriteria.Summary}, where vs is the VarStatus property in the table and Summary is the attribute name. 
Setting this value, will query the column attribute, without customizing the filter component.


 - The custom tool tip for the table column filter can now be set on the shortDesc property of Input Text. After this modification, the column code looks like:


UI

Monday, July 2, 2012

Using groovy expression for throwing dynamic error message

In this post, I will explain a simple use case of groovy expression for throwing error message.

If there is a Business rule defined on an Entity Object attribute such that, a Date value cannot be less than the current Date and if this Business Rule is violated an error message should be thrown like : The value entered, <enteredDate> is less than the Current Date <currDate>.

For this add an attribute validator on the date attribute.

Select the rule type as Script Expression and define the rule as shown below:


In the failure handling tab, define the message string as shown:


Map the enteredDate to newValue and currDate to adf.currentDate in the token message expressions.

When this rule is violated the error message is shown as:

Sunday, June 24, 2012

Select/Deselect All check box in a table

Select All/Deselect All check box in a table is a common requirement. This can be implemented in multiple ways. In this blog, I will explain the steps, I used for one of my project.

Follow these steps:

-  Add a transient attribute(say SelectDept) of type Boolean in the view object. Don't forget to set the updatable property to Always. 

Drag and drop the view object from the data control as an ADF Table

- Convert the SelectDept column to SelectBooleanCheckBox. Add command links to select/deselect check box in the header facet of this column.

- Call managed bean methods on click of the command link. After all these modifications the column code should look like:


- The bean methods onSelectAll, onDeselectAll in turn calls the method selectAllDept, deSelectAllDept respectively in AMImpl.java. It basically iterate through the RowSetIterator of DepartmentsView and set the value of SelectDept attribute, depending on the method being called.


UI Page:

Instead of command links (Select All/Deselect All), you can have a select boolean check box as well. On selecting it, all the check box are checked and un-selecting it will un-check all the check box in the table.

This code is also available in sample work space. Uncomment the select boolean check box in the column header facet and put the partial triggers of this boolean check box on the table.


Sample Workspace:
Download the sample workspace from HERE.

Saturday, June 23, 2012

SelectManyCheckBox component in a table

This post is very similar to my earlier post on Implementation of SelectManyCheckBox component. The use case/functionality remains same. But it defers only in the usage of SelectManyCheckBox component. In earlier post, I used it in a form layout. In this blog, I will explain how to use SelectManyCheckBox/SelectManyChoice component inside a table column for persisting/displaying the selected values for an EMP record  as shown:


Steps are:
1. Create a Fusion Web Application.
2. Create all the required Business Components (EO, VO,VLink AM) for the above data model.
3. Create a view link between EmpVO and EmpRolesVO, which will be used to display the SelectManyCheckBox as selected for an EMP record/row.

The above 3 steps are similar to the steps in earlier post.

4. Create two transient attributes SelectedRoles, StoredRoles in EmpVO. StoredRoles is used to fetch the selected roles from db for an EMP record. Where as SelectedRoles is populated when roles are selected for an EMP record from the UI.  

5. Override the getter method of StoredRoles attribute in EmpVORowImpl as shown below:


6. Drag and drop EmpVO as ADF table on the page.

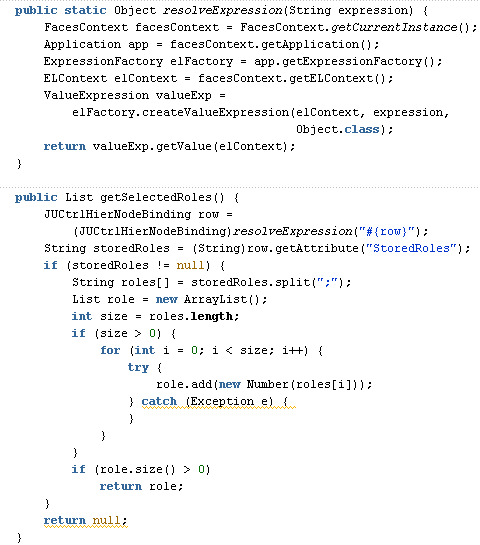
7. Create another column in the table and then drag a SelectManyCheckBox UI component in it and bind the value property of it to a managed bean, which evaluates the Roles to be displayed as selected for an EMP row as shown:


Here the expression #{row} will give handle of each row being stamped in the table. Using this row, we can get StoredRoles attribute which is calculated in the getter method (EmpVORowImpl) for each EMP row using the ViewLinkAccessor as explained in Step#5 above. StoredRoles is then returned as a List of RolesId (Number).

8. A valueChangeListener method is called on selecting/un-selecting the SelectManyCheckBox component.


Here, getSelectedRow method returns the selected row in table. Using this we can populate the SelectedRoles attribute with the value returned from the SelectManyCheckBox component. Then the selected row keys is saved in a pageFlowScope variable which will be used to commit the data.

9. On clicking of the Commit button, all the data is saved in the database as shown:


I tried getting all the selected row keys using the getSelectedRowKeys() method on table with RowSelection=multiple. But it was returning only the last selected row key. Therefore I have to use the pageFlowScope approach.

Sample Workspace:
Download the sample workspace from HERE.

Sunday, June 17, 2012

Format: Date and Number fields in table

To format a date field on UI, use <af:convertDateTime>.
For example, if a date has to be displayed in 12-Jan-2012 format, use convertDateTime as below:


Output:


Similarly to format a number field on UI, use <af:convertNumber>.
For example, if the salary of an employee has to be displayed in 12,000 format, use convertNumber as below:


Output:

Thursday, June 14, 2012

ADF Coding Standards & Check points

For any ADF Java code, Model and UI layer, here are few points to make code better from writing from performance and standard point of view, that comes from our coding practice and experience.

There is a set of checkpoints we should check before source controlling any changes.This ensures making code better, robust, standards compatible and more performant.

JSFF/JSPX code - Check points
  • Make sure, you have used Resource Bundle where ever its required.
  • For Bounded taskflows, make sure to use activation as conditional/deferred (Not Immediate) and use active condition EL expression.
  • Id of the component, length should be <= 7.
  • Make sure, you have removed unwanted PageDef Bindings.
  • If af:popup is used, make sure to set the contentDelivery to "LazyUncached".
  • If using af:contextInfo, make sure the af:dialog has modal="false".
  • If using af:contextInfo, make sure the af:showPopupBehavior has triggerType="contextInfo".
  • If using af:popup from af:commandLink, make the partialSubmit to true for af:commandLink.
  • If using af:popup. make childCreation property to "deferred" so that only when the Popup is launched the WebBean hierarchy would get created in server memory.
  • Run JAudit for the file you make changes, from Menu->Run->JAudit file.
  • Right click->Reformat before checkin.
  • If using JavaScript, can you think to avoid that.
  • jsff/jspx files must reside under /page package.
  • Taskflows must reside under /flow package.
  • Menu model xml files must reside under /menu package.
  • In Case of deriving the Url parameters, preferably use the following syntax to derive declaratively #{facesContext.externalContext.requestParameterMap['Empno']}
    (Empno is url parameter)

Any Java Code - Check points
  • Managed Bean class name should end with "Bean".
  • Don't use SOP statements.
  • New methods introduced, make sure they are modular so that they can be JUnitized.
  • New Method should always return a value so that they can be JUnitized.
  • Add Logger statements to the new methods.
  • Make sure you have thrown sufficiently Exceptions.
  • Run JAudit for the file you make changes, from Menu->Run->JAudit file.
  • Make sure to define the Variables with a name starting with small letter.
  • Do not use underscore (_) in Variable and Method names.
  • Make sure to check for Null condition for all operation that could throw NullPointerException. Ex: CollectionModel, Row, ViewObject, ApplicationModule, String objects etc.
  • Right click->Reformat before check in.

Application Module(AM) - Check Points
  • Make sure to Use JNDI datasource instead of JDBC URL in the AM configuration(i.e bc4j.xcfg)
  • Number of occurrences of createRootApplicationModule() or *AMImpl.getInstance() should be same as releaseRootApplicationModule(). 

Entity Object - Check Points
  • Can you convert the code you have just written into Groovy?
  • Run JAudit for the file you make changes, from Menu->Run->JAudit file.

View Object - Check Points
  • Get SQL explain plan every time you touches a VO.
  • For new Attributes added, make sure you use proper UI hints.
  • If creating a New VO, make sure its is based on an EO (Exceptions to be considered).
  • If createViewObject calls are present, then make sure, you remove those dynamic ViewObjects.
  • If setting rangeSize() to -1, restore the rangeSize after you work on that.
  • Don't set ListRangeSize == '-1' unless the ViewAttribute using the LOV has CONTROLTYPE 'choice' or 'radio' or 'default'
  • FetchSize should be <= 25 or same as number of rows to be displayed in UI.
  • Avoid use of vo.getRowCount()
  • View Criteria shouldn't have "null checking" checkbox checked.
  • LOVs shouldn't have "query automatically" checked.
  • SQL based VOs,should have query optimizer hint set to "FIRST_ROWS(10)".
  • Always test the application with ampooling= false when our bc4j transaction involves any transient VO's.

Most of the above points were shared with me by one of my superior(Amulya Mishra) when I was a novice ADF developer. So, thought this check list will be helpful for other novice developers, like it helped me :)

Interesting blogs about Jdev Roadmap